alt-web logo

Tips & Tutorials for Web Designers

Thursday, November 8, 2012

Primer for Using jQuery Plug-Ins

From slideshows and sliders, to forms & mobile apps,   jQuery plug-ins are an easy way to add advanced web features (widgets) to your site without a lot of heavy manual coding.  Knowing how to use jQuery plug-ins will open up a whole new world of possibilities to you.
  1. Download the Plug-in files from the source site. I'm using jQuery Cycle in this example.
  2. For .zip file downloads, extract all contents with WinZip or StuffIt and save to your local site folder.  Click on screenshot.


    For plain text files, simply copy & paste the Plug-in code into a new blank JavaScript page and SaveAs: plug-in-name-ver.js to your local site folder.
  3. For site management reasons, I prefer to keep scripts in my Scripts folder, CSS files in my Styles folder and images in my Images folder but that's up to you. 
  4. jQuery has 3 basic parts to it:    
    1. the core code library which you ref in your <head> tags,
    2. the plug-in scripts & CSS files (if any) which you ref in your <head> tags,
    3. the function code inside <script> tags to invoke the plug-in. 
DOCUMENT EXAMPLE:
=======================

<!doctype html>
<html>
<head>
<meta charset="utf-8">
<title>jQuery Plug-In Page</title>


<!-- jQuery latest core library from CDN-->
<script type="text/javascript" src="http://code.jquery.com/jquery-latest.min.js">
</script>

<!-- links to plug-in files within your local site-->

<script type="text/javascript" src="Scripts/jquery.cycle.all.latest.js"></script>
<link rel="stylesheet" type="text/css" href="Styles/plug-in-name.css" media="screen" />

</head>

<body>
<div class="slideshow">
     <img src="Images/slide1.jpg" width="200" height="100" alt="description" />
     <img src="Images/slide2.jpg" width="200" height="100" alt="description" />
     <img src="Images/slide3.jpg" width="200" height="100" alt="description" />
     <img src="Images/slide4.jpg" width="200" height="100" alt="description" />
</div>

<!--Plug-In Function Code-->
<script type="text/javascript">
$(document).ready(function() {
    $('.slideshow').cycle({
     fx: 'fade'
   });
});
</script>

</body>
</html>

=======================
HINTS:  
  • Ensure paths to your plug-in files are correctly pointing to file & folder names within YOUR site folder.
  • Linux servers are cAsE sEnSiTiVe. For best results use all UPPER or all lower case file names.
  • Don't use spaces in file or folder names. Dots, dashes or underscores are fine but not spaces.
  • Lastly, refer to your particular Plug-in's official documentation for the correct function code, fx,  and classes to use.
That's all there is to it.  I hope you enjoyed this brief introduction to using jQuery Plug-Ins. 

Monday, March 5, 2012

Create Pop-up Window in Dreamweaver (Behaviors Panel)

This is an old post demonstrating JavaScript Behaviors.  The preferred method now is Modal or Lightbox windows.

Creating a JavaScript Behavior

  1. Insert an image or type some text on your page.
  2. Highlight text or select image by clicking on it and go to the Link field in your Properties Panel as in (Fig. 1).
  3. Fig. 1
  4. Browse for the file or type the full URL: http://example.com
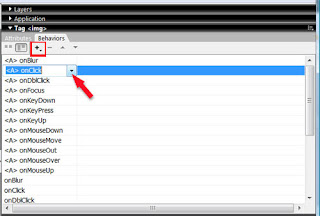
  5. Go to the Behaviors Panel and hit the plus sign (+) to add a new behavior (see Fig. 3)
  6. From the menu, select Open Browser Window (Fig. 2)
  7. Browse to file or type the URL (Yes, a 2nd time).
  8. Set the height, width and other optional attributes for your pop-up window.
  9. Fig.2
  10. Hit OK.
  11. Verify that the behavior's trigger event is <A> onClick.  If it's not, click inside the event box to show other trigger options.
  12. Fig. 3
  13. Go back to the Properties Panel (Fig. 4) and replace the first URL in the link field with javascript:()  This makes the primary link into a null link so the page doesn't open twice.
  14. Fig. 4
  15. Save your page and preview in browsers.
That's all there is to it.  Hope you enjoyed this brief tutorial.

Working With Dreamweaver Templates (.dwt files)

PART 1 -- Template Creation

  1. Create a page with all the site wide elements (common header, footer, sidebar, etc..) that you will need for your project.   This requires some careful planning even for small web sites.
  2. Validate your code with the W3C code validation tools.
    CSS - http://jigsaw.w3.org/css-validator/
    HTML - http://validator.w3.org/
     
  3. Test your prototype page in all major browsers. 
  4. When you're completely satisfied with the page layout, SaveAs Template.   DW will save this as a .dwt file in a site folder called Templates.
  5. DW will ask you to add Editable Regions for stuff that will change from page to page.   Do this and hit SAVE (Ctrl+S).
  6. Close your Template.dwt file.

PART 2 -- Home Page Creation

  1. File > New  > Site Templates.  Select your site from panel #2.  Select your Template.dwt file from panel #3.  Hit the Create button.
  2. This is known as a child page.  You can only edit content within editable regions.  Everything else is locked or grayed out.
  3. SaveAs index.html (your domain home page) in the root of your local site folder.

PART 3  -- Creating Other Site Pages

  1. Repeat PART 2 for each additional page required.

PART 4  --  Editing Templates

  1. Open your main TEMPLATE.dwt file and add a navigation menu with links to your site pages.
  2. SAVE (Ctrl+S).
  3. DW will ask if you want to populate changes to child pages.  Hit yes.
  4. Publish all site pages to your server.

PART 5

If you ever need to edit your TEMPLATE.dwt file, Repeat PART 4 and re-publish all child pages.